Product Feature: Manage Seating with Real-Time Collaboration
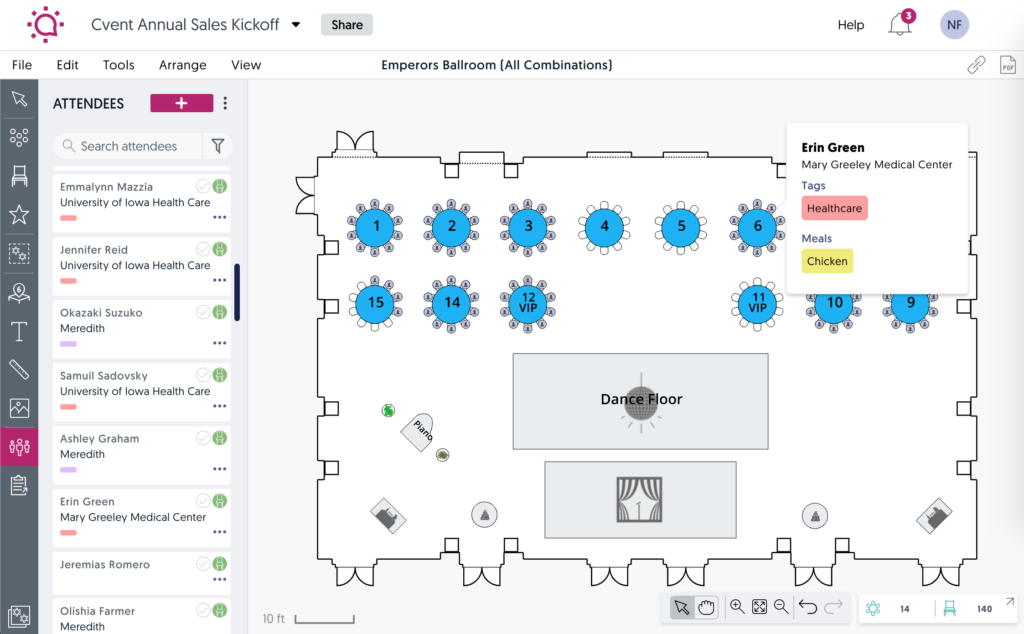
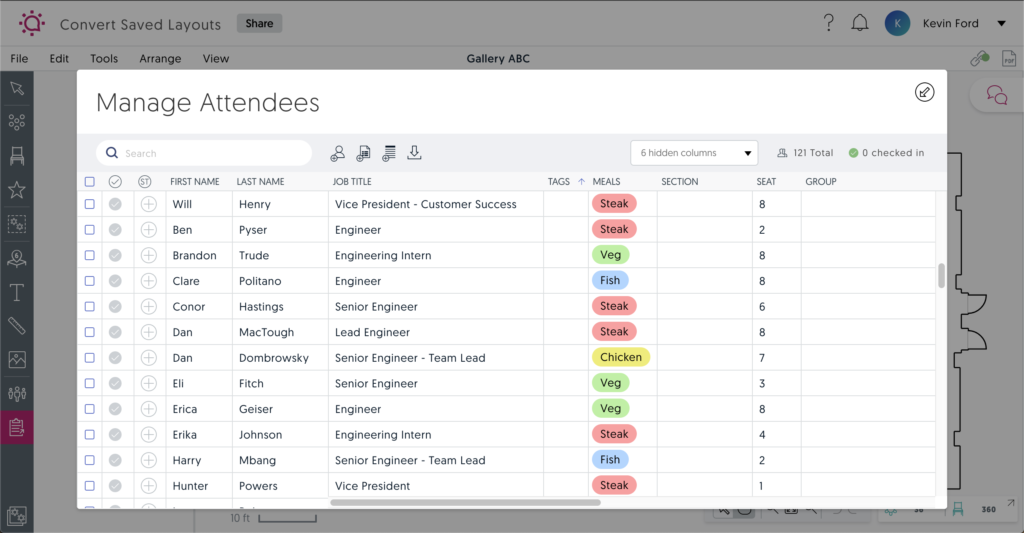
When it comes to working with your client or the venue on seating, it’s sometimes easier to show a visual. You can add any event stakeholders as collaborators to an event diagram or seating plan. Once you’ve been added as a collaborator to an event, just accept the invitation via email. Then, right in Social Tables software, you can easily add your guest list, manage any custom guest preferences such as meal types using tags, and manage seating, on your event’s diagram in real-time.
[Tweet “Get event stakeholders on the same page with seating via real-time collaboration.”]

Logging in
For the best experience possible, we recommend using Google Chrome or Firefox. Open your browser and visit https://login.socialtables.com/ to access Social Tables. Then login with your email and the created password.
Click on your event to open the diagram. Once in your diagram, on the bottom left side of the screen click on this icon.
Add your guests
To start adding guest to manage seating, all it requires is the data in a CSV or Excel file. Quickly importing your guest list from an Excel spreadsheet into Social Tables Check-In is a simple, three-step process. To begin, select Import at the top of the screen, or if there aren’t yet any guests in the Event, you can also select Import Guests right from the middle of the screen.
1. Upload the CSV
Select the CSV, XLSX icon and choose the guest list file from your computer. Though each file format is compatible, we recommend using CSV file format. You’ll also see a link to download our recommended template. (Click here for the template!)
2. Review the Data
Match the fields of your CSV guest list into the fields of Check-In. Our Column Names are listed on the left and Your Matching Column Names are listed on the right. We make our best guess at matching the columns up correctly (another reason to use the recommended template linked above), but you’re free to make adjustments. And if our default fields aren’t enough, add up to 10 additional Custom Fields as well!
Seat Upon Import
If the tables have been Named or Numbered in the diagram, guests can be seated automatically If you do not Seat guest on import, Table Name and/or Numbers will not be imported from the Excel/CSV file.
3. Confirmation
After uploading the file and matching the fields, you’ll receive a confirmation of a successful import. You’ll also receive confirmation any type of error or discrepancy that occurred during the import, such as a duplicate guest or a formatting issue with the original spreadsheet.

Edit your guests
Open the Edit Guest window by clicking on the guest. From there, you can:
- Edit the guest’s name and other information
- Add or create Tags & Meals
- Upload an image of the guest from your computer
- Create new custom fields
- Delete the guest

Create tags & meals
Tags and Meals provide a simple way to add meal information or other important labels and identifiers to your guests. Both exist within the guest list itself and can be assigned to or removed from guests individually or en masse.
Add Tags & Meals from the Edit Guest window
Add existing Meals and Tags to a guest from within the Edit Guest window.
Create new Tags or Meals from within the Edit Guest window by typing the new name and pressing enter on your keyboard.
Tags & Meals Sections
Select Tags or Meals to view and manage all guests associated with that tag or meal.
Seat your guests
Once you’ve created your event setup, importing and seating your attendees is a great way to guarantee on site success when your attendee’s arrive.
You’ll be able to create a visual Seating chart with all the attendee information you could possibly need! Think meals, titles and other customizable tags! It’s as easy as clicking and dragging your imported attendees to their seats!
Ready to manage seating with collaboration tools? Click here to sign up or check out our Seating Chart Maker to begin bringing your event to life!

